
How To Care For Your Canvas Tarp
One of the toughest, trustiest tools for farmers, campers, homeowners, long-haulers are canvas tarps. Made with breathable and durable materials and treatments with a classical yet rustic aesthetic, canvas tarps offer a practical piece of gear for a wide range of uses.
But a tool is only as good as it’s upkeep. Like any tool, the proper cleaning, storing, and maintenance will extend a canvas tarp’s lifespan. So how do you care for your canvas tarp to ensure it lasts? From regular cleanings to grommet repairs, this article breaks down everything you need to know about how to care for your canvas tarp.
Caring for Canvas Tarps
Cleaning a Canvas Tarp Regularly
A heavy-duty canvas tarp can last you a long time, but regular cleanings are essential. Otherwise, all that dust, dirt, and grime that accumulates from outings and hunting trips can build up on your canvas tarp and lead to mold and mildew.
You can start by giving your canvas tarp a good shake-down. This will help loosen any dirt. Next, take a soft brush and very lightly brush the surface, removing anything you might've missed.
To clean a stubborn stain more thoroughly or spot clean, use a solution of warm water and mild soap. Use a clean brush, too! Not the brush you just used to remove surface dirt. This step should give your canvas tarp a deeper clean while also being gentle on the fibers and any treatments.
When cleaning a canvas tarp, the main point is that you must avoid harsh detergents that can deteriorate the material.
Drying a Canvas Tarp Properly
Whether you have recently cleaned your tarp or had no choice but to pack it away after a rainy camping trip, dry a canvas tarp thoroughly. Putting away a wet canvas tarp in storage can really do a number on it. Even a light dampness can lead to mold and mildew.
Still… there's a wrong way and a right way to dry your canvas tarp. While it might seem smart to dry your tarp faster with help from a nearby bonfire or large high-heat source, the hotter temperatures can damage the fibers and even weaken sealants. And never, ever attempt to throw it into a dryer (even a larger commercial dryer).
So here's what to do instead: Simply hang your canvas tarp outside in the sun. The natural sunlight and breezes will do most of the work for you.
Repairing a Canvas Tarp: Tears, Grommets, and Treatments
While cleaning and drying your canvas tarp, especially older and used ones, you might have noticed a few tears or rips needing repair. Heck, you might've even been obvious when it leaked during your recent trip. Either way, here are some common maintenance and repairs you might need to make.
Tears and Rips
Promptly repairing tears and rips in your canvas tarp is important to ensure the issue doesn't get any worse. Canvas repair kits and canvas patch kits are often available from the manufacturer, providing the same canvas weight and material to maintain the integrity of your (newly repaired) canvas tarp.
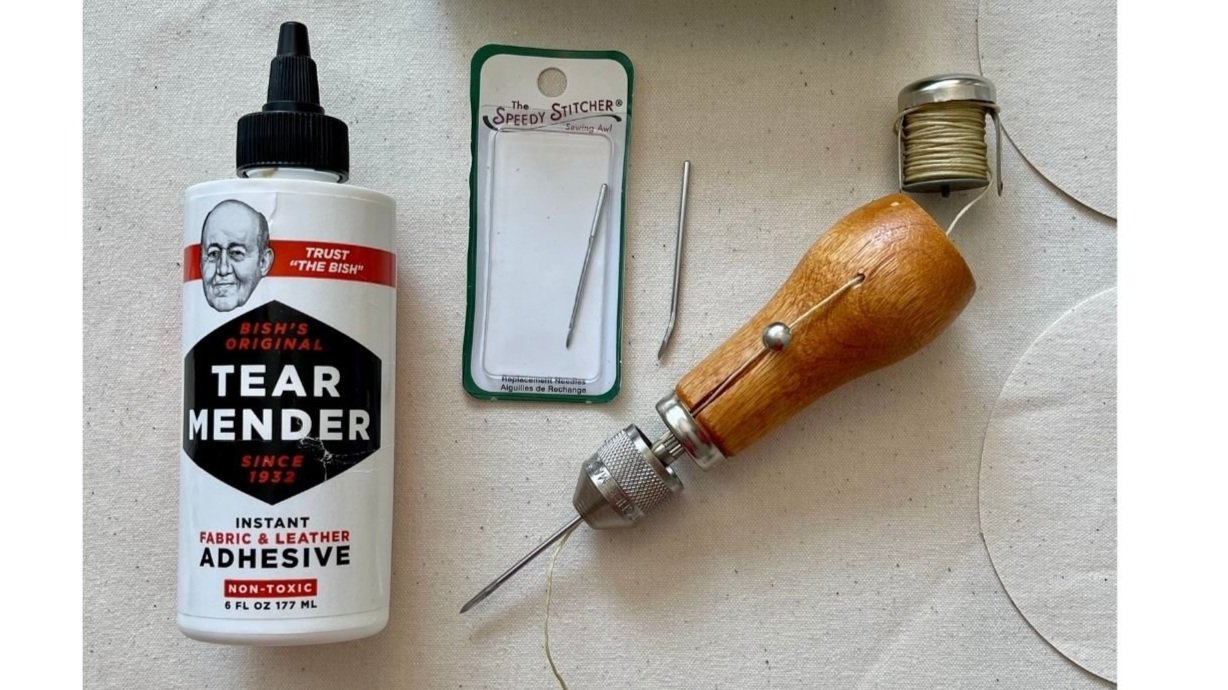
Fix minor rips and tears with the tried-and-true Bish's Tear Mender, an adhesive made for canvas tents and canvas tarps. Bish's is waterproof, quick-drying, and UV-resistant and can repair leaks on the spot. We recommend just having this around for repairing canvas tents, too.
Second to Bish's is the Speedy Stitcher sewing awl, which is better for sewing up larger tears and tips. With the help of heavy-duty upholstery thread (think polyester, nylon, or wax finish), this sewing awl can help sew patches on in the wilderness or back home.
Look at our Fixing a Leaking Canvas Tent article for more thorough instructions on repairing tears and rips. Although it's for canvas tents, the steps in patching holes are the same.
Grommets
If you frequently hang and tie off your canvas tarp, tearing out a grommet is not unheard of. It can happen in high winds and heavy snowfall when pressure is added. So what do you do?
Start by getting a grommet kit, which should include a hole cutter, extra grommets, tin snips (to remove old grommets), et cetera. It doesn't need to be canvas-specific; any grommet kit will do the trick. It can also work for vinyl tarps, mesh, and other fabric-based projects around the house. If your torn grommet and hole are frayed, a patch of canvas or repair tape allows you to fix the hole and add a new grommet, so consider that, too.
To start, grab a wood block. Ideally not rough firewood, but something with a flat, smooth side. You're going to use the block to cut a hole and hammer in the new grommet.
Now, using the hole cutter, align it over where you want the new grommet to be and hammer it down, creating a fresh hole. This might be on a fresh canvas patch, if necessary.
Next, place the top grommet on the anvil tool and position it through the hole.
Once it's in position, align the bottom grommet and hammer it down (from both sides), fastening the two grommet pieces securely together. Voila!
Need a grommet kit? We recommend this professional grommet kit by General Tools. They also offer an easy-to-follow grommet repair instructional video demonstrating how to use it.
Retreating
After years of trusty service, you could also retreat or reproof your canvas tarp, helping to keep it water-resistant and mildew-free. You also need to take this step if you patched your tarp and replaced the hole with untreated canvas.
To reproof your entire canvas tarp or new repair, we recommend using Dry Guy Waterproofing Concentrate, a protective barrier that keeps water out and the tarp from leaking. To apply, get yourself a pressurized hand sprayer for an efficient coat.
Furthermore, we highly suggest reproofing your canvas tarp on a late summer weekend. This helps give the sun time to dry the sealant and avoids dampness and rain that tends to come in spring and fall.
Tarp Storage Protection

Tarp storage is often overlooked. When you're done using a heavy-duty tarp, it's easy to assume it's rugged enough to be tossed in the back of the garage or barn, wherever you keep the rest of your tools and gear. But it's also rather easy and effortless to take a few extra precautions to make your canvas tarp last.
For starters, fold your (completely dry) canvas tarp loosely. You want to avoid creating creases that could eventually lead to rips or tears. You could even fold it into loose sections, depending on how large your stretch of canvas tarp is, and then roll the remainder (think cowboy bedroll swag).
Ideally, you should get a plastic container to place your canvas tarp in, which will help you determine what size to roll it up. Even if your canvas tarp comes with a bag, look for a container that can protect it just a bit further. Rodents are notorious for chewing through the canvas to make warm nests, so something like a Rubbermaid container is optimal.
Lastly, make sure your canvas tarp storage is shielded from direct sunlight. Yes, canvas tarps are perfect for the outdoors, but UV rays can deteriorate canvas over time. Also, be sure to store canvas tarps in a dry, moisture-free space.
Beckel Canvas Tarps
Canvas tarp care is crucial in extending its lifespan. However, purchasing the right tarp is vital too. Choose the right size and finish to meet your needs.
Using an untreated canvas tarp outside is a recipe for disaster. It will deteriorate in no time at all and not protect you as it should. It's also a wise idea to choose the right canvas type size for your needs. Choose a canvas tarp that's too small, and you could find yourself compensating for space, stretching and tearing fibers, which can result in a tear or torn grommets.
Beckel Canvas specializes in a wide range of heavy-duty canvas products, one of which is canvas tarps. Beckel's handmade canvas tarps are 100% cotton canvas, waterproof, and designed to withstand harsh weather conditions. But more than that, they're made with features that help make care for your canvas tarp easy. Features like double-stitched hems and seams, durable rust-resistant grommets, and a weighty 10.1 oz Sunforger™ canvas treated to be water-repellant and mold, mildew and UV-resistant, ultimately ensuring your canvas tarp can withstand a lifetime with a little bit of proper care.